Table of contents
Docker-Volume
Docker allows you to create something called volumes. Volumes are like separate storage areas that can be accessed by containers. They allow you to store data, like a database, outside the container, so it doesn't get deleted when the container is deleted. You can also mount from the same volume and create more containers having the same data.
Docker volumes are like secret hideouts for your container data. They give you a safe place to stash all your important stuff. With Docker volumes, you can keep your data separate from your containers, just like hiding your snacks from nosy roommates. It's like having a secret bunker where you can store files, databases, or even a collection of cat videos. You can mount volumes to specific paths in your containers, so it's like having a direct tunnel to your hidden treasure. The best part? Even if your containers throw a wild party or disappear into thin air, your data remains untouched, like a time capsule waiting to be discovered. Docker volumes keep your data safe, sound, and ready to party, no matter what happens.
Docker Network
Docker allows you to create virtual spaces called networks, where you can connect multiple containers (small packages that hold all the necessary files for a specific application to run). This way, the containers can communicate with each other and with the host machine (the computer on which the Docker is installed). When we run a container, it has its own storage space that is only accessible by that specific container. If we want to share that storage space with other containers, we can't do that.
Docker networks are like cozy hangout spots for containers. It's where they can meet up, have a chat, and exchange high-fives. Think of it as a virtual club where containers can party together. They get their own private space to connect, share stuff, and collaborate like a well-oiled team. Docker networks make it easy for containers to socialize, boosting the awesomeness of your applications.
Types of Docker Networks Drivers
Bridge: Default network driver, enables communication between containers on the same host.
Host: Shares host network with containers, eliminating network isolation.
Overlay: Facilitates communication between containers across multiple Docker hosts.
Macvlan: Assigns a MAC address to each container, enabling direct connection to the physical network.
None: Disables networking for containers, useful in specific scenarios where networking is not required.
Some Docker Network Commands that are mostly used :
Create:
docker network createList:
docker network lsInspect:
docker network inspectConnect:
docker network connectDisconnect:
docker network disconnect
Task-1
- Create a multi-container docker-compose file that will bring UP and bring DOWN containers in a single shot ( Example - Create application and database container )
Before we dive into the project don't forget to give sudo permission to the USER for Docker.
sudo usermod -aG docker $USERcreate a .yml file
vim docker-compose.yml

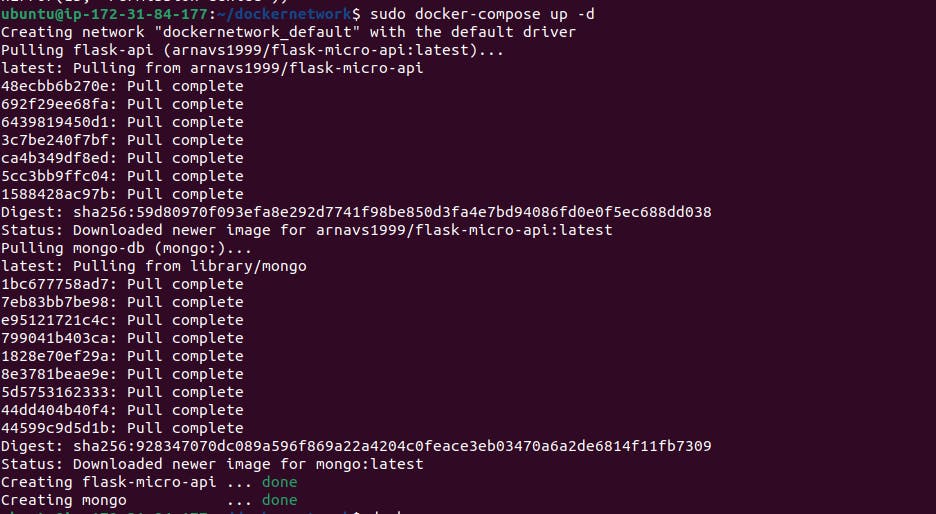
Use the
docker-compose upcommand with the-dflag to start a multi-container application in detached mode.docker-compose up -d

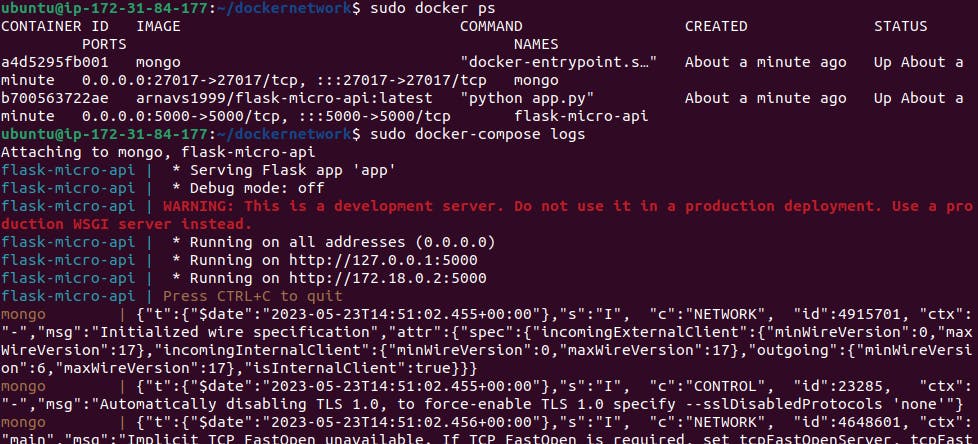
Use docker ps command to show running containers
docker ps

- Use the
docker-compose scalecommand to increase or decrease the number of replicas for a specific service. You can also addreplicasin the deployment file for auto-scaling.
docker-compose up --scale flask-api=3
docker-compose up --scale flask-api=3 scales the flask-api service to run three instances. This command will start additional containers for the flask-api service, resulting in three instances running simultaneously.
- Use the
docker-compose pscommand to view the status of all containers, anddocker-compose logsto view the logs of a specific service.

- Use the
docker-compose downcommand to stop and remove all containers, networks, and volumes associated with the application
docker-compose down

Task-2
- Learn how to use Docker Volumes and Named Volumes to share files and directories between multiple containers.
Docker Volumes and Named Volumes are useful features for sharing files and directories between multiple containers. They provide a way to persist data and make it accessible to multiple containers, even if the containers are destroyed and recreated.
- Creating a Docker Volume: To create a Docker Volume, you can use the
docker volume createcommand.
docker volume create mydocker-flaskapi

Named Volumes-They are a type of Docker volume that is given a specific name when created, making it easier to reference and reuse across multiple containers.
Mounting a Volume to a Container: To use a volume in a container, you need to mount it by specifying the volume name and the mount point inside the container. You can do this with the
-vor--mountflag when running a container.
docker run -d -v mydocker-flaskapi:/app/data <image_name>
- Create two or more containers that read and write data to the same volume using the
docker run --mountcommand.
Run the First Container: Start the first container and mount the shared volume to a directory inside the container. This container will write data to the shared volume:
docker run -d --name container1 --mount source=mydocker-flaskapi,target=/data 51672fb1eeb9 #your 1st image id
Run the Second Container: Start the second container and also mount the shared volume to a directory inside the container. This container will read data from the shared volume
docker run -d --name container2 --mount source=mydocker-flaskapi,target=/data 8b33e239cde6 #your 2nd image id


- Verify that the data is the same in all containers by using the docker exec command to run commands inside each container.
Write Data to the Shared Volume->Access "container1" and write some data to the shared volume. You can use the docker exec command to execute commands within the running container.
docker exec -it container1 sh
echo "Data from container1" > /data/file.txt
Read Data from the Shared Volume->Access "container2" and read the data from the shared volume.
docker exec -it container2 sh
cat /data/file.txt
The output should display the content written by "container1".

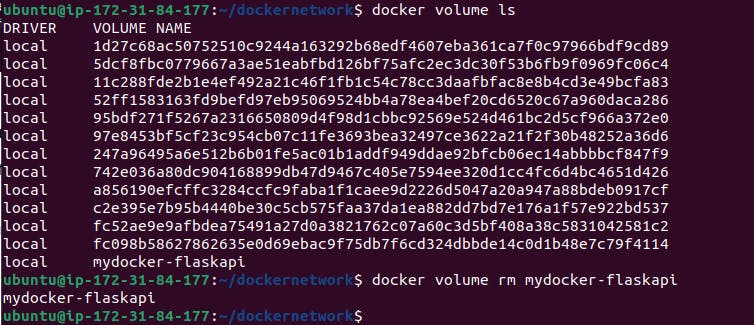
- Use the docker volume ls command to list all volumes and docker volume rm command to remove the volume when you're done.
NOTE:-Before removing the volume it is necessary to kill and stop both containers otherwise it will give an error like "Error response from daemon: remove mydocker-flaskapi: volume is in use"
docker volume ls # this will list all volumes
docker volume rm mydocker-flaskapi #this will remove volume

Thank you for reading. I hope you were able to understand and learn something new from my blog.
Happy Learning!
Please follow me on Hashnode and do connect with me on LinkedIn ArnavSingh
