

Table of contents
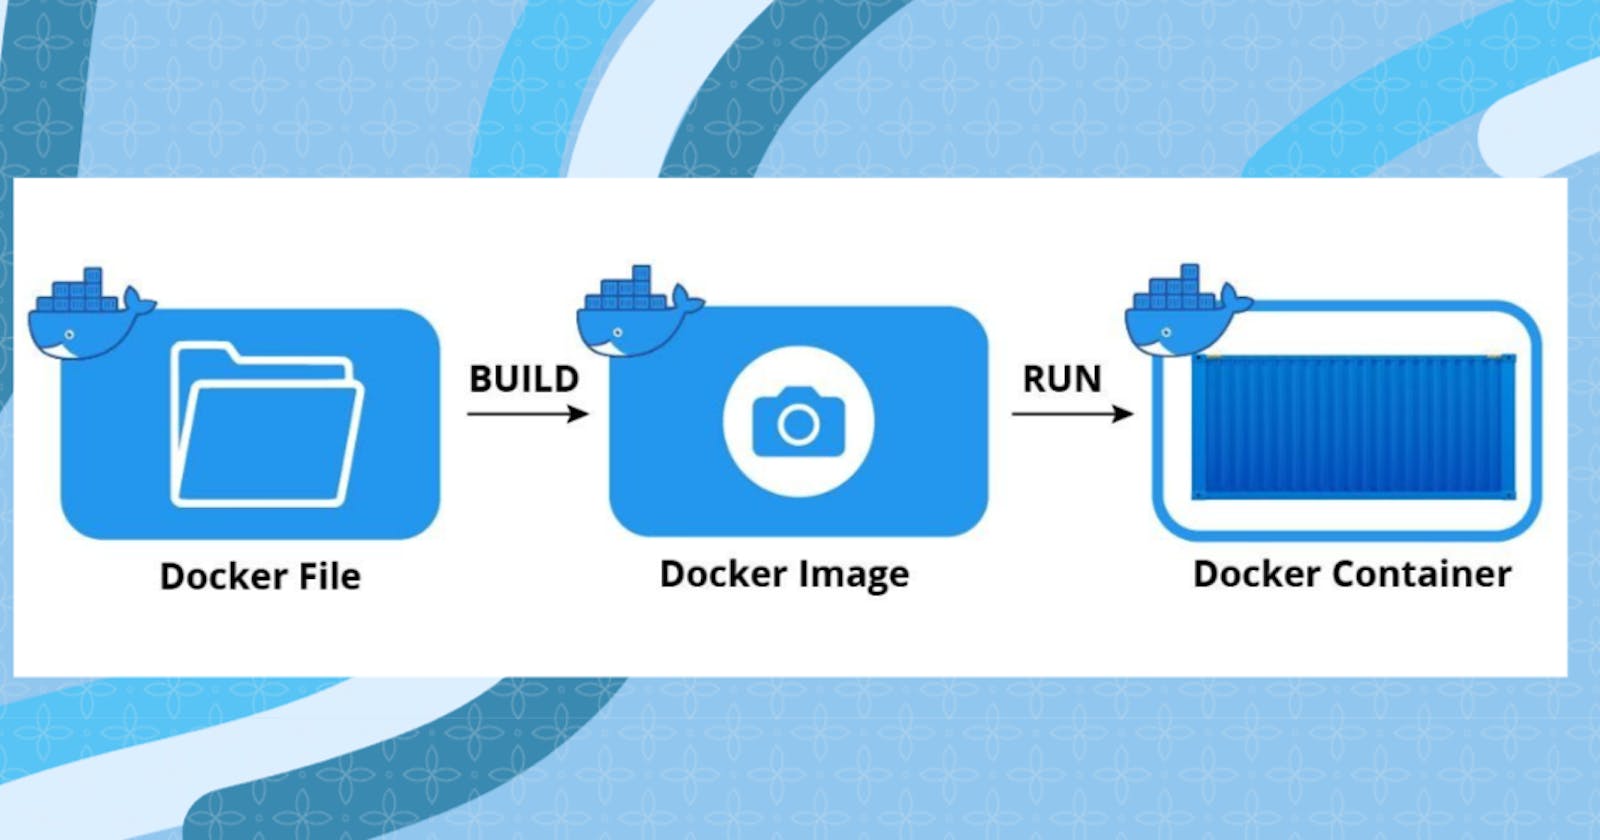
Dockerfile
A Dockerfile is a text file that contains instructions for building a Docker image. It defines what software, dependencies, and configurations are needed for an application to run correctly in a Docker container. Dockerfile simplifies the process of creating and deploying applications by providing a standardized way to package and distribute software, making it easier to manage and replicate across different environments.
Dockerfile instructions are used to define the steps required to build a Docker image. Here are some commonly used instructions:
FROM: Specifies the base image for your Docker image.
RUN: Executes commands inside the container during the image build.
COPY: Copies files or directories from the host machine to the container.
ADD: Similar to COPY, but can also handle URLs and automatically extracts compressed files.
ENV: Sets environment variables inside the container.
EXPOSE: Informs Docker that the container listens on specific network ports at runtime.
CMD: Provides default commands to be executed when the container starts.
ENTRYPOINT: Configures a command or script to run as the main process in the container.
WORKDIR: Sets the working directory for subsequent instructions.
VOLUME: Creates a mount point and specifies that the directory should be persisted outside the container.
Task:
Create a Dockerfile for a simple web application (e.g. a Node.js or Python app)
Build the image using the Dockerfile and run the container
Verify that the application is working as expected by accessing it in a web browser
Push the image to a public or private repository (e.g. Docker Hub )
Step 1-> Clone the GitHub repository of the project

Step 2-> Create Dockerfile inside the repository with "vim Dockerfile" command.
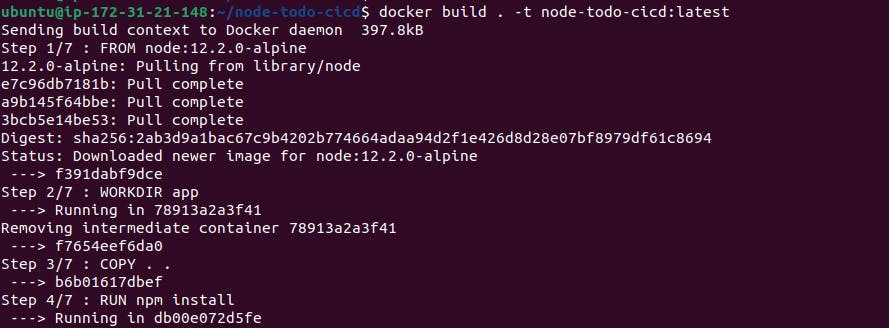
Step 3-> Adding instructions to build the Docker image.
"FROM node:12.2.0-alpine" specifies the base image as Node.js version 12.2.0 on Alpine Linux.
"WORKDIR app" sets the working directory inside the container as "/app".
"COPY . ." copies all files from the current directory to the container's "/app" directory.
"RUN npm install" installs the project dependencies inside the container.
"RUN npm run test" runs the tests for the application inside the container.
"EXPOSE 8000" exposes port 8000, allowing external access to the container on that port.
"CMD ["node","app.js"]" defines the command to be executed when the container starts, running the "app.js" file with Node.js.

Step 4-> Build the image using the Dockerfile.
Using the command "sudo docker build . -t node-todo-cicd:latest".

Step 5-> After successfully creating an image, create and run the container from that image.
Using the command "docker run -d -p 8000:8000 node-todo-cicd:latest".
"docker run": This is the command to run a Docker container.
"-d": It runs the container in detached mode, which means it runs in the background.
"-p 8000:8000": It maps port 8000 of the host machine to port 8000 of the container. This allows accessing the containerized application on port 8000 of the host.
"node-todo-cicd:latest": It specifies the name of the Docker image to use, in this case, "node-todo-cicd" with the "latest" tag.

Step 6-> Verify that the application is working as expected by accessing it in a web browser.
Before accessing the application we have to add port "8000" in AWS ModifyInboundSecurityGroupRules in Security Groups to allow access to run application in web browser.

application is successfully running.
Step 7-> Push the image to a public or private repository (e.g. Docker Hub ).
->First create a DockerHub profile.
->Create a public repository.
->Login DockerHub on host machine.

->With the command "docker push arnavs1999/node-todo-cicd:latest"

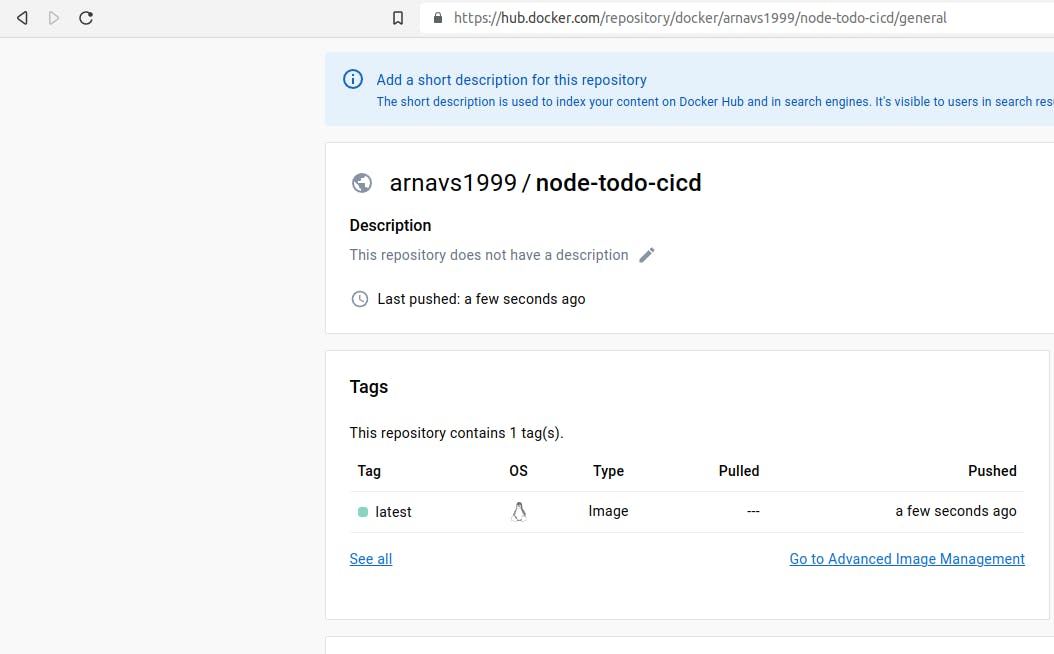
The image is successfully pushed to DockerHub repository
Thank you for reading. I hope you were able to understand and learn something new from my blog.
Happy Learning!
Please follow me on Hashnode and do connect with me on LinkedIn ArnavSingh