What is minikube?
Minikube is a tool that allows you to run a single-node Kubernetes cluster on your personal computer.
To understand what Minikube does, let's break it down:
Kubernetes: Kubernetes is a powerful open-source platform for managing containerized applications. It helps you deploy, scale, and manage your applications flexibly and efficiently.
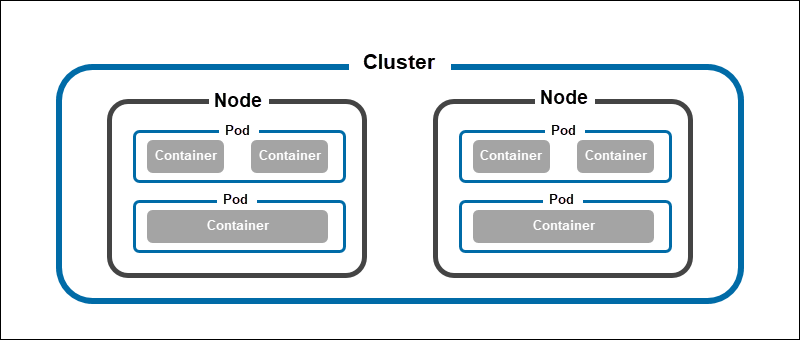
Cluster: In the context of Kubernetes, a cluster is a group of computers (or virtual machines) that work together to run your applications. It provides a scalable and reliable environment for your applications to run.
Minikube: Minikube is a tool that simplifies the process of setting up and running a Kubernetes cluster. It allows you to create a small-scale, local cluster on your computer, which you can use for testing, development, or learning purposes.
In simple terms, Minikube helps you set up a mini version of a Kubernetes cluster on your computer, allowing you to experiment with Kubernetes without the need for a full-scale infrastructure. It provides a convenient way to learn about Kubernetes concepts, develop and test applications, and understand how your applications would behave in a production-like environment.
Features of minikube
(a) Supports the latest Kubernetes release (+6 previous minor versions)
(b) Cross-platform (Linux, macOS, Windows)
(c) Deploy as a VM, a container, or on bare-metal
(d) Multiple container runtimes (CRI-O, containerd, docker)
(e) Direct API endpoint for blazing-fast image load and build
(f) Advanced features such as LoadBalancer, filesystem mounts, FeatureGates, and network policy
(g) Addons for easily installed Kubernetes applications
(h) Supports common CI environments
Let's understand the concept of pod
In simple terms, think of a pod as a small group of closely related containers that work together.
Imagine you have a project where you need multiple software components to work together, such as a web server, a database, and a caching system. Each of these components can be packaged as a container, which is a lightweight and self-contained unit of software.
Now, instead of running each container separately, you can create a pod in Kubernetes to group them together. The pod acts as a logical host for the containers, ensuring they are deployed and managed as a cohesive unit.
Pods share the same network namespace, meaning they can communicate with each other easily. They are also scheduled and placed on the same physical or virtual machine, allowing them to have fast and efficient communication.
Pods provide a way for containers to work together and share resources, such as storage and network connections. They are designed to be ephemeral, which means they can be easily created, destroyed, and replaced. This flexibility makes it easier to scale your applications and manage them efficiently.
In summary, a pod is a way to group related containers together, providing them with a shared environment and facilitating their collaboration within a Kubernetes cluster.

To create pods in Kubernetes, you need to define a YAML file that describes the pod's specifications. Here's a simplified example of how you can create a basic pod:
Create a file (e.g.,
pod.yaml) and open it in a text editor.Specify the API version, kind, and metadata for the pod. The API version specifies the Kubernetes API version to use, and the kind indicates that you're creating a pod. Metadata includes information like the name and labels for the pod. Here's an example:
apiVersion: v1
kind: Pod
metadata:
  name: my-pod
  labels:
    app: my-app
- Define the pod's specification, including its containers. Specify the container image, name, and any required configurations or resources. Here's an example with a single container:
spec:
  containers:
    - name: my-container
      image: nginx:latest
Save the file.
Use the
kubectlcommand-line tool to create the pod by running the following command:
kubectl create -f pod.yaml
Kubernetes will read the YAML file and create the pod based on the provided specifications. You can then use kubectl to manage and monitor your pods.
Task 1: Install Minikube
Step 1:- I am going to use the AWS EC2 instance. Firstly we need to create an EC2 instance and while launching the EC2 machine need to select t2.medium. Because if you need to install Kubernetes in any EC2 machine, the configuration should be having a minimum of 2 CPUs, 4GB of free memory, 20 GB of free disk space.

Step 2:- Then Install Docker on your EC2.
sudo apt update -y
sudo apt install docker.io -y
sudo systemctl start docker
sudo systemctl enable docker
sudo systemctl status docker
# add docker in user group
sudo usermod -aG docker $USER
#Reboot system
sudo reboot
Step 3:- Now install Minikube.
 curl -LO https://storage.googleapis.com/minikube/releases/latest/minikube-linux-amd64
 sudo install minikube-linux-amd64 /usr/local/bin/minikube
Step 4:- If we need to interact then we need to install CLI as a kubelet.
sudo snap install kubectl --classic
Step 5:- Start your cluster.
minikube start --driver=docker

Task 2: Create your first pod on Kubernetes through Minikube.
Create a YAML file to define your pod. For example, create a file named
pod.yamland open it in a text editor.Inside the
pod.yamlfile, define the pod's specifications.
apiVersion: v1
kind: Pod
metadata:
  name: nginx
spec:
  containers:
  - name: nginx
    image: nginx:latest
    ports:
    - containerPort: 80
This YAML file specifies a pod named "nginx" that contains a single container named "nginx" using the NGINX image.
Save the
pod.yamlfile.Apply the pod configuration to the Minikube cluster by running the command
kubectl apply -f pod.yaml. This command tells Kubernetes to create the pod based on the configuration specified in the YAML file.

- Verify that the pod is running by running the command
kubectl get pods. It will show the status of the pod, and you should see your pod listed with the status of "Running".
Congratulations! You have successfully created your first pod on Kubernetes using Minikube.
Thank you for reading. I hope you were able to understand and learn something new from my blog.
Happy Learning!
Please follow me on Hashnode and do connect with me on LinkedIn ArnavSingh.
