

What is Deployment in k8s?
In simple terms, a Deployment in Kubernetes is a way to manage and ensure the availability of your application or service. It helps you define and control how many replicas (copies) of your application should be running at any given time.
Imagine you have a web application that consists of multiple containers working together, such as a front-end container, a back-end container, and a database container. A Deployment allows you to define the desired state of your application and manages the process of creating, updating, and scaling the necessary replicas.
Here's how a Deployment works:
Desired State: You define the desired state of your application in a Deployment configuration file using YAML or JSON. This includes specifying the number of replicas, container images, ports, and other details.
Automatic Creation: When you create a Deployment, Kubernetes automatically creates the specified number of replicas (pods) based on your configuration.
Scaling: If you need to scale your application, you can update the Deployment configuration to increase or decrease the number of replicas. Kubernetes will automatically adjust the number of running replicas to match the desired state.
Rolling Updates: When you make changes to the Deployment configuration, such as updating the container image or other parameters, Kubernetes performs rolling updates. It gradually replaces the existing replicas with new ones, ensuring that your application remains available during the update process.
Self-Healing: If a replica fails or becomes unresponsive, Kubernetes automatically replaces it with a new one, ensuring that the desired number of replicas is maintained.
Load Balancing: Kubernetes automatically distributes incoming network traffic across the available replicas of your application, ensuring efficient load balancing.
By using Deployments, you can manage the lifecycle of your application, easily scale it up or down, perform rolling updates, and ensure high availability. Deployments are an essential building block in Kubernetes for managing and maintaining your applications in a reliable and scalable manner.
Task-1:Create one Deployment file to deploy a sample todo-app on K8s using the "Auto-healing" and "Auto-Scaling" feature
add a deployment.yml file (sample is kept in the folder for your reference)
apply the deployment to your k8s (Kubeadm) cluster by command
kubectl apply -f deployment.yml
Step 1:- Create a Manifest file named deployment.yml where all the configuration related to the image will store.
apiVersion: apps/v1
kind: Deployment
metadata:
  name: todo-app-deployment
spec:
  replicas: 2
  selector:
    matchLabels:
      app: todo-app
  template:
    metadata:
      labels:
        app: todo-app
    spec:
      containers:
        - name: todo-app
          image: trainwithshubham/django-todo:latest
          ports:
            - containerPort: 8000
replicas: 3: This specifies that we want to run three replicas of the todo-app.selector: This defines the labels used to identify the pods associated with this Deployment.template: This specifies the configuration for the pods created by this Deployment.
Step 2:- If you intend to enable autoscaling for your deployment, you should use a separate HorizontalPodAutoscaler resource in conjunction with your deployment.
- Create a separate file named
hpa.ymland define theHorizontalPodAutoscalerconfiguration.
apiVersion: autoscaling/v1
kind: HorizontalPodAutoscaler
metadata:
  name: todo-app-hpa
spec:
  scaleTargetRef:
    apiVersion: apps/v1
    kind: Deployment
    name: todo-app-deployment
  minReplicas: 2
  maxReplicas: 5
  targetCPUUtilizationPercentage: 70
autoscaling: This enables auto-scaling based on CPU utilization. It ensures that the number of replicas scales up or down based on the defined target CPU utilization percentage. In this example, it scales between 2 and 5 replicas.
This HorizontalPodAutoscaler configuration specifies that the target deployment is todo-app-deployment and sets the minimum and maximum number of replicas, along with the target CPU utilization.

Step 3:- Apply the changes separately. First, apply the deployment.yml file using the command:
kubectl apply -f deployment.yml
Step 4:- Then, apply the hpa.yml file using the command:
kubectl apply -f hpa.yml

By separating the hpa.yml configuration from the Deployment.yml configuration, you can avoid the validation error and correctly configure autoscaling for your deployment.
Note - To scale deployment by adjusting the number of replicas.
You can use the following command:
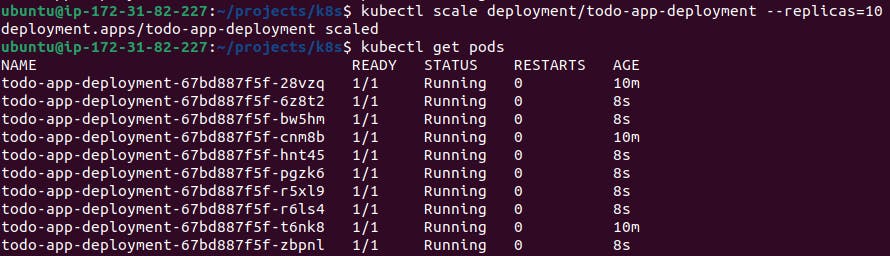
kubectl scale deployment/todo-app-deployment --replicas=10
This command specifies the deployment todo-app-deployment and sets the number of replicas to 10. Kubernetes will then adjust the number of running pods to match the desired replica count.
After running the command, you can verify the scaling by running kubectl get pods and checks that 10 pods are running for the specified deployment.
Step 5:- Now if we need to delete deployment we can use the below command.
kubectl delete -f deployment.yml

Thank you for reading. I hope you were able to understand and learn something new from my blog.
Happy Learning!
Please follow me on Hashnode and do connect with me on LinkedIn ArnavSingh.